Tuesday, October 9, 2012

Glorious Autumn Block Party... Candy Corn Block Tutorial and Giveaway

Hello Everyone,

Welcome to the tutorial for the Glorious Autumn Block party.  Michele at the Quilting Gallery asked me to design a block for this fabulous party and all I could think about was candy corns!! So that is the block I designed.  

Here are a few details that you need to know before we get started.  Head over to the Quilting Gallery, you will find a designer profile of little old me and some answers to some questions that you might find interesting to know about me!!  You will also find a quilter's Super Deal today.  Then this week there will be two more blocks from Vicki at The Quilting Lodge and Jovita's Patchwork Atelier.

And then don't forget to go to the Flickr group and see ALL the blocks from participants and designers.  Don't forget to post your candy corn block too!!  Oh yea... there is a GIVEAWAY at the end of this tutorial too.

You can print a PDF of this tutorial by clicking on the link just below this post, it is a green button that says "Print PDF".  Now let's get started!

Here is what you will need:


(6) ~ 1.5 X 12.5 inch strips.  I choose  two oranges, two yellows, and two creams.  They gently gradate from dark to lighter.


Then sew the top three together and the bottom three together.  Then sew the two sets together to form your candy corn strip set.


There are two ways to cut your candy corn.  If you have a 60 degree triangle ruler you can simply use this to cut your candy corn.


If not you can take a regular ruler and place the 60 degree line at the top edge of the cream.


and the edge of the ruler should intersect exactly with the corner of the bottom orange strip.
  

Now make your first cut on the left with your 60 degree ruler.


or with your regular ruler.


Then make your second cut on the right with your 60 degree ruler.


If you are using the regular ruler, reverse the ruler to the other side and then line up the 60 degree line with the cream strip.


and have the edge of the ruler intersecting the edge of the bottom orange strip.


Make your second cut.


Now you have your candy corn.  You can make one more from this strip set, but it will be a "reverse" candy corn.
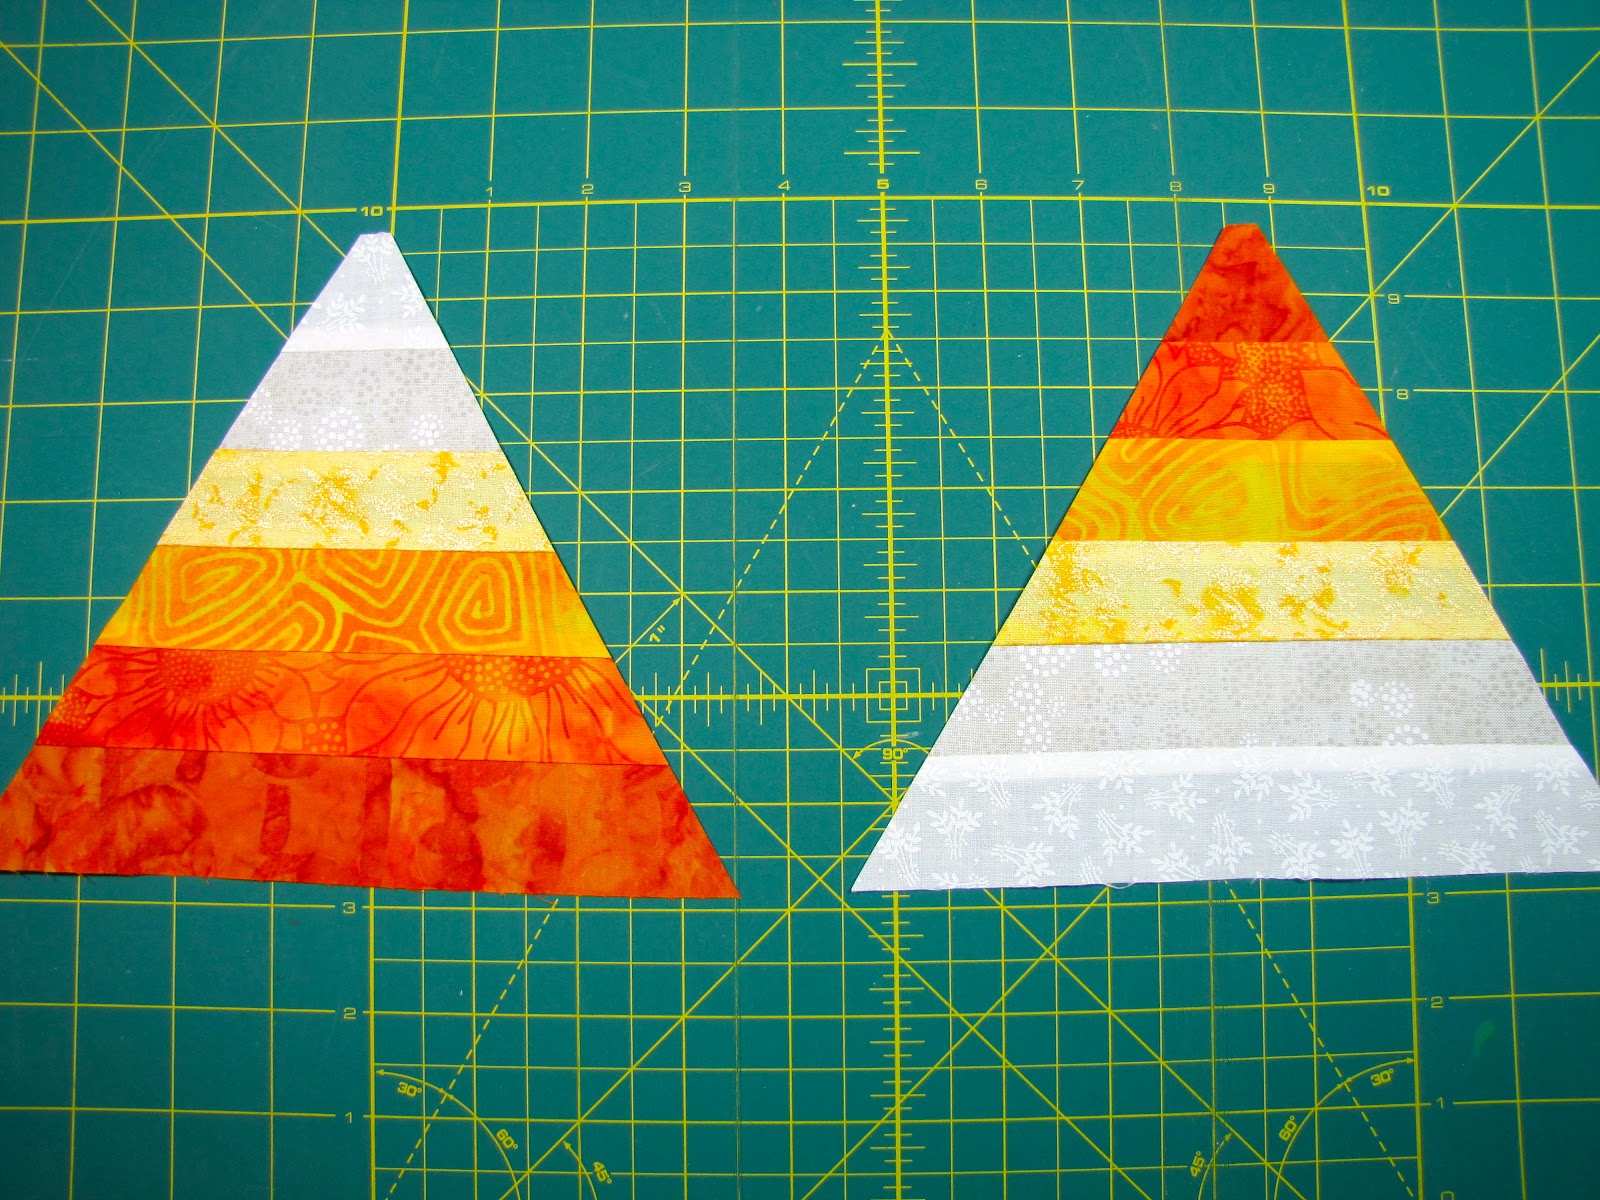

Here is what you have.  Now for the background fabric.


You will need a fat quarter.


From the fat quarter:

Cut (2) ~ 3.5 X 13 5/8 inch strips
Cut (1) ~ 13 5/8 X 13 5/8 inch square


Lay your candy corn on the square and then..


Measure 2 7/8 inches in from each edge of the square, above shows the right side.


This shows the left side.


Now you will take your regular ruler and place the 60 degree line on the bottom edge of the gray square and 2 7/8 from the left edge.


Here is a closer look.


Or if you have the 60 triangle ruler you may use it by placing it exactly 2 7/8 inches in from both edges of the square, as shown above.


You will make your first cut with either ruler and it will go 6.5 inches up to the top of where the candy corn will be.


Here is a better photo.


Now make your second cut on the right.


Here it is with the regular ruler.


Once those cuts have been made you will measure 6.5 inches up from the bottom edge of the square and cut across the top edge of the ruler.


Do the same to the right side.


Here are the pieces that you will have.  You can discard the triangle.


Take the left side and lay it over the candy corn as such.  Leaving the corner of the left edge of the candy corn slightly exposed, about 1/4 inch.


Here is a close up.  Sew the background fabric to the candy corn and press towards the background.


Now take the right side and repeat.


Laying it on the candy corn with the bottom edge exposed about 1/4 inch.


Here is the close up.  Sew the right side of the background to the candy corn and press to background.


Here is what you have now.  This is where you will add the two 3.5 X 13 5/8 inch strips to the top and the bottom.  Sew them on...


Here is what you will have, press towards the background away from the candy corn.


Trim the edges down to 12.5 inches square.


Now you have a Candy Corn block, but don't stop there....


Layer it and quilt with a really pretty variegated thread.


Here is the backing fabric I used on mine.


Here is the quilting.  Now bind and then get creative!


I made two and then filled these jars with candy corns and pumpkins,  some candy corn hand sanitizer, and little pumpkin witch photo holders (found at Pier 1 imports) 


Wrap them up and then send them to your daughter and her roommate at college!  They loved them!!

Or you can make an entire candy corn quilt!! How fun would that be?  Or you can make little trick or treat bags from the blocks for the little ones in your life!  They would love it!! 

I hope you enjoyed the tutorial and I would love to see your blocks!  


Would you like to win these??? I am giving away 10 fat quarters of Gypsy Bandana fabric that I have leftover in the shop and would love for one of you to have them!!  

Here is what you need to do:

1) Leave a comment and tell me what you think about the candy corn block and what you plan to make with it. (one entry)
2)  Sign up for my e-newsletter, click here, then leave a comment letting me know you have signed up.(second entry)

That is it!! The giveaway will remain open for a week.  Good luck!!

**** Thank you to all who entered the giveaway and have enjoyed the tutorial! The giveaway is now closed and I will be announcing the winner soon. *****

Until Next Time...

Share/Bookmark

Monday, October 8, 2012

A Quilt Show Worked Into A Family Weekend

Hello Everyone,

This weekend was spent home with the family taking care of business on the home front!   We had a great weekend and were even able to hop in the convertible on Saturday and head to my friend Justine's quilt show for a few hours.  On the way, grabbed some Mexican food for lunch... YUM!

I wanted to share a few photos from this unique show with you.


The show is in the sanctuary of her church.  A beautiful old church.  Quintessential New England.  Don't the quilts brighten up the pews?


There is my Diamonds Down Under quilt.


This beautiful Cathedral Windows quilt was for sale!  Gorgeous!!


There is my hubby's Serengeti Serenade quilt hanging from the balcony.


Look at what my hubs and I purchased!!  Sooooo excited there were a few expertly crafted hooked rugs on display and they were for sale.  I would have loved to buy them all, but couldn't afford all of them.  So my hubby and I agreed on this beauty!!

I think I need to make a quilt that looks like this... don't you think??


Here is my Island Breeze quilt.


There was a wonderful old crazy quilt on display made from all silks and velvets.  Just look at the detail.


The stitches are perfection!!


Love this photo of the church all decked out.


There is Justine!  She is just one of most wonderful people that I know!


Here is a look at the outside of the church.   Very inviting!

After this we ran errands and had some dinner with our son.

Sunday was spent getting tons done at home.  I feel like I got lots accomplished and spent some quality time with the family.

Make sure you stop back tomorrow for a great little tutorial!!

Until Next Time...

Share/Bookmark

Saturday, October 6, 2012

Loving the Lemoyne Star in Two Ways

Hello Everyone,

Yesterday, I played BIG time!! I just had the urge to make a TON of Lemoyne Star blocks.  I had started some a while ago and I sooooo needed to make some more.


I love this technique in making them.  This is NOT paper pieced.  You can do it by paper piecing, but you don't have to if you don't want.


This technique is all strip pieced! Yes, no cutting of diamonds.  I am doing them in two different fabrics... Kaffe Fassett fabrics and African fabrics... you will see them further down in the post.  The Kaffe fabrics that I am using are reds and yellows... many different fabrics too!  This will be very scrappy.


I love the trimming pile, so pretty.


The strips are cut and sewed together and eventually you get this shape, then re-sew them and you get these...


Lovely Lemoynes!!  I am making many different sizes with this technique too... very cool! 


Here are my African Lemoyne stars.  I love the way the African fabric looks against the black Kona.


This technique give you perfect points too!  Gotta love that!


Here are the sizes that I made yesterday left to right in inches:

9.5, 8.5, 6.5, 4.5, and 3.5.


This one is the little mini 3.5 inch... look at those points!  I am sure you would like to know how I made these?

I have been using the Rapid Fire Lemoyne Star Ruler.  You can find it in my shop by clicking here.  

And I will be teaching this method and at a retreat in Vermont in March!  If you would like to learn it from me, just click here for the details and to register for the retreat.


It makes Lemoyne star blocks that range in size from 3" to 12" blocks.  Truly a great alternative to paper piecing and easy to do because it is all strip pieced.  

Wait until you see the quilt that will be made with these blocks.  But don't worry, there will be 2 quilts, one Kaffe and one African.

P.S.  This weekend there is a Columbus Day Sale going on in my shop, all Black and White fabrics are marked down to $7.50 per yard, Batiks to $8.50 per yard, and Australian Aboriginals to $8.50 per yard but only through Monday.

Enjoy!


Until Next Time...

Share/Bookmark

Friday, October 5, 2012

Cathedral Window Blocks

Hello Everyone,

You might have wondered why I have been away from my blog for a little bit?  Two words... hand work.  

I must say I am a bad bee member.  Several months ago, Stephanie from Peas In A Pod, had sent us instructions on making some Cathedral Window blocks for the Two's Company Bee.  I must confess... even though I was busy as a bee for the summer months and with the quilt show, these blocks frightened intrigued me.  While I had all intentions of doing them the first week month that I received them, that came to pass.  I hang my head very low... :(

But, now that the quilt show is over and things are starting to get back to some sense of normalcy, I devoted my time to get these blocks done and back to Stephanie.


I had success!!  These are now on their way back to her to add to her two color quilt.  I hope that they will enhance the quilt that you are making Stephanie and please accept my sincerest apologies for the delay.

A few things I learned while doing these blocks...

1.  Hand sewing is definitely slower than using the machine (not really a light bulb moment, I knew this already)
2.  I prefer machine sewing over hand sewing.  Although the one caveat is that I really LOVE hand sewing my binding down... go figure.
3.  These are really pretty blocks.
4.  I have a great admiration for quilters who make quilts totally by hand ~ AWESOME!
5.  I will NEVER make one of these quilts... sorry to disappoint.

But if any of you are so inclined to make one of these quilts, this is the book that Stephanie recommended.
 I must say that the instructions are very clear and concise.  So if you are so inclined to make one of these beauties... go for it!  Just be aware that it may take you a very long time.  Though I do think this is a great project to do while watching TV and riding in the car.

Hopefully now I will get back to some regularly scheduled blogging and oh, I need to do a podcast too!

Until Next Time...

Share/Bookmark

Thursday, October 4, 2012

Blogger's Bar Hop Quilt Along... A Tutorial

Hello Everyone,

Scott Hansen of Blue Nickel Studios invited me to participate as a designer in the Bar Hop Quiltalong and I was delighted!


Bars because of the shape... usually rectangular like candy bars... we can all relate to this right?  The fabric is from Clothworks the European Taupe VIII Collection by Kinkame.  The only fabric that I added was Kona Oyster which can be found here in my online shop.


Here is what you will need to make my block which I call "Vertical Horizon".

Kona Oyster ~ 
(4) 1.5 X 3.5 inch pieces
(6) 2.5 X 3.5 inch pieces
(4) 12.5 X 1.5 inch pieces

Red Fabric ~
(3) 2.5 X 3.5 inch pieces

Blue Fabric ~
(3) 2.5 X 3.5 inch pieces

Beige Floral ~
(1) 2.5 X 6.5 inch piece


Lay them out as show above.

You will use 1/4" inch seam throughout the sewing process.


First you will sew the rows of rectangles together. The Oyster to the reds and blues, and the oyster to the floral as shown above.


Then sew the long Oyster strips to the tops and bottoms of the red and blue fabric leaving the floral row out.


Sew the floral row to the top row of blues and red.


Then sew the bottom row of reds and blue to the floral row.  You now have a 12.5 inch square block to go along with the rest of the Bar Hop Quiltalong blocks. 

You can post yours here on the Flickr group.

To get the rest of the blocks follow these links:

October 1 Amy Ellis
October 2 Lynn Harris   
October 3   Heather Jones    
October 4   Jackie Kunkel    
October 5 Ashley Jones
October 6  Emily Cier 
October 7 Scott Hansen
October 8 Jan Peoples
October 9 April Rosenthal
October 10 Amy Lobsiger
October 11  Cara Quilts
October 12   Konda Luckau
October 13  Alethea Ballard
October 14 Charlie Scott

Enjoy!!

Until Next Time...


Share/Bookmark
Related Posts Plugin for WordPress, Blogger...

