Showing posts with label tutorial. Show all posts

Friday, May 10, 2013

Between Heaven and Texas Blog Hop Tour... Giveaway and Star Tutorial

Hello Everyone,

Today is my day to introduce to you, my good friend, Marie Bostwick's newest book...
Between Heaven and Texas.

But along with that there are some other goodies too.  With each stop on the tour you will receive a new block to make.  The one below is mine.  


I call it Top of the Rainbow. 

 Note the similarities in the colors to the quilt on the cover of Marie's book!!

You can download the PDF for the star here.

Now onto the book...


Marie's book is just fabulous!  And this is not a biased statement.  I have read all her books from the Cobbled Court Quilt Series as well as this book too.  This book is sort of a prequel to the Cobbled Court Quilt Series.  The main character is Mary Dell, who was featured in her previous books. 

You will come to love and know Mary Dell so much more intimately in the book.  Learning more of her background and where she comes from just endears her more to you.  That said... I am keeping my mouth shut on the rest of the book.  I want you to read it for yourself... you will love it!!


Don't forget to visit all the other blogs for your chance to enter a book and also to grab some wonderful FREE star tutorials.


Oh... so one more thing.  I have been friends with Marie for quite some time.  I think I first met her in 2007 in the local quilt shop that was open at the time in my town.  Marie lives very close to me, so I do have the opportunity to see her.  

But each time she has a new book come out, I either go to her house or she comes to mine and I interview her on my podcast.  This book was no different.  You can hear her on my podcast...


You can listen on your computer by clicking here.  Or if you prefer you can download it from iTunes and listen on your iPod or other MP3 device, by clicking here.

Here are all the stops on the blog hop.

Monday, April 29 – Marie Bostwick
Tuesday, April 30 – Michele – Quilting Gallery
Wednesday, May 1 – Bonnie – Quiltville
Thursday, May 2 – Pat – Pat Sloan
Thursday, May 2 – Kim – Persimon Dreams
Friday, May 3 – Melissa – Happy Quilting
Saturday, May 4 – Jo – Jo’s Country Junction
Sunday, May 5 – Wendy – Ivory Spring
Monday, May 6 – Victoria – Bumble Beans Inc.
Tuesday, May 7 – Vicki – Quilting Lodge Blog
Wednesday, May 8 – Melissa/Jake – Generation Q Magazine
Thursday, May 9 – Jennifer – Sew Hooked
Friday, May 10 – Jackie – Canton Village Quilt Works

You can download the PDF tutorial for my block by clicking here.
or Find all the stars here with direct links to each Blog Hop post.

Want to help out a great cause while enjoying the great free patterns from Marie’s Blog Tour? Make an extra star block and donate it the The Linus Connection! Any and all 12″ star blocks are welcome!
Jennifer from SewHooked has been an active volunteer for The Linus Connection for over 10 years. To date, she has made and donated approximately 300 quilts and blankets since 2002, many of them made from orphan blocks donated by quilters from around the world from generous quilters like you!
The Linus Connection is a 501(c)(3) organization based in Austin, Texas whose mission is to make and deliver handmade security blankets for children in crisis situations in the Central Texas area. The blankets go to children in hospital emergency rooms, in crisis centers, in foster care, battered women’s shelters, to any child who is in need of a little extra security in their lives.
Contact Jennifer for mailing information at sewhooked@gmail.com or visit The Linus Connection blog to find out other ways you can help!


Now it's time for a giveaway.  One lucky reader will win a copy of Marie's book.  Just leave a comment on this blog post and tell me your favorite book.  The giveaway will be open until May 12th at 11:59 PM CST.  Good Luck! 

Don't forget...There's also a bonus giveaway if you complete the quilt top using the designer’s blocks and upload a photo to our Flickr group by September 1, 2013.  You’ll be entered to win an audio version of Marie’s new book. This version is due to be released sometime in September.

Best of luck to everyone!!

Comments are now closed.


Until Next Time...

Share/Bookmark

Monday, April 22, 2013

Celebrate! Coaster and Mat Tutorial and Giveaway

Hello Everyone,

I had the pleasure of working with some wonderful fabrics from Fabri-Quilt and made a cute little set that is fantastic for a gift and quick and easy to make!


I call this set Celebrate!


Perfect for that party with your friends with a carafe of Sangria or Margaritas!!  YUM! 


Coasters decked out in their own individualized bindings to differential each guest's glass.


And a mat to rest your carafe.  A fun little design and a great hostess gift.

I have a tutorial on how to create this set, but you will need to click here to go to Fabri-Quilt's blog for the instructions and to enter the giveaway!

You can purchased the Black and White fabric by clicking here and the Marblehead Global Brights by clicking here.


Good Luck!!


Until Next Time...

Share/Bookmark

Tuesday, February 19, 2013

Tutorial and A Giveaway

Hello Everyone,

I have made a bright and funky table runner for you!! Well not this one, but you can make one just like it, yes you can!!


This one is now on my kitchen table and after I had it bound it was kitty approved.  I really like it as it make this dreary winter just a whee bit brighter.

You can find my tutorial on the Fabri Quilt blog!  This is their fabric that I used to design the runner.


Folk Heart by Sara Trail

You can win a fat quarter pack of this fabric too!  We would love to hear what you would make with this fabric.  The giveaway will be open through Sunday, February 24 and the winner announced on February 25, 2013.


Until Next Time...


Share/Bookmark

Tuesday, October 9, 2012

Glorious Autumn Block Party... Candy Corn Block Tutorial and Giveaway

Hello Everyone,

Welcome to the tutorial for the Glorious Autumn Block party.  Michele at the Quilting Gallery asked me to design a block for this fabulous party and all I could think about was candy corns!! So that is the block I designed.  

Here are a few details that you need to know before we get started.  Head over to the Quilting Gallery, you will find a designer profile of little old me and some answers to some questions that you might find interesting to know about me!!  You will also find a quilter's Super Deal today.  Then this week there will be two more blocks from Vicki at The Quilting Lodge and Jovita's Patchwork Atelier.

And then don't forget to go to the Flickr group and see ALL the blocks from participants and designers.  Don't forget to post your candy corn block too!!  Oh yea... there is a GIVEAWAY at the end of this tutorial too.

You can print a PDF of this tutorial by clicking on the link just below this post, it is a green button that says "Print PDF".  Now let's get started!

Here is what you will need:


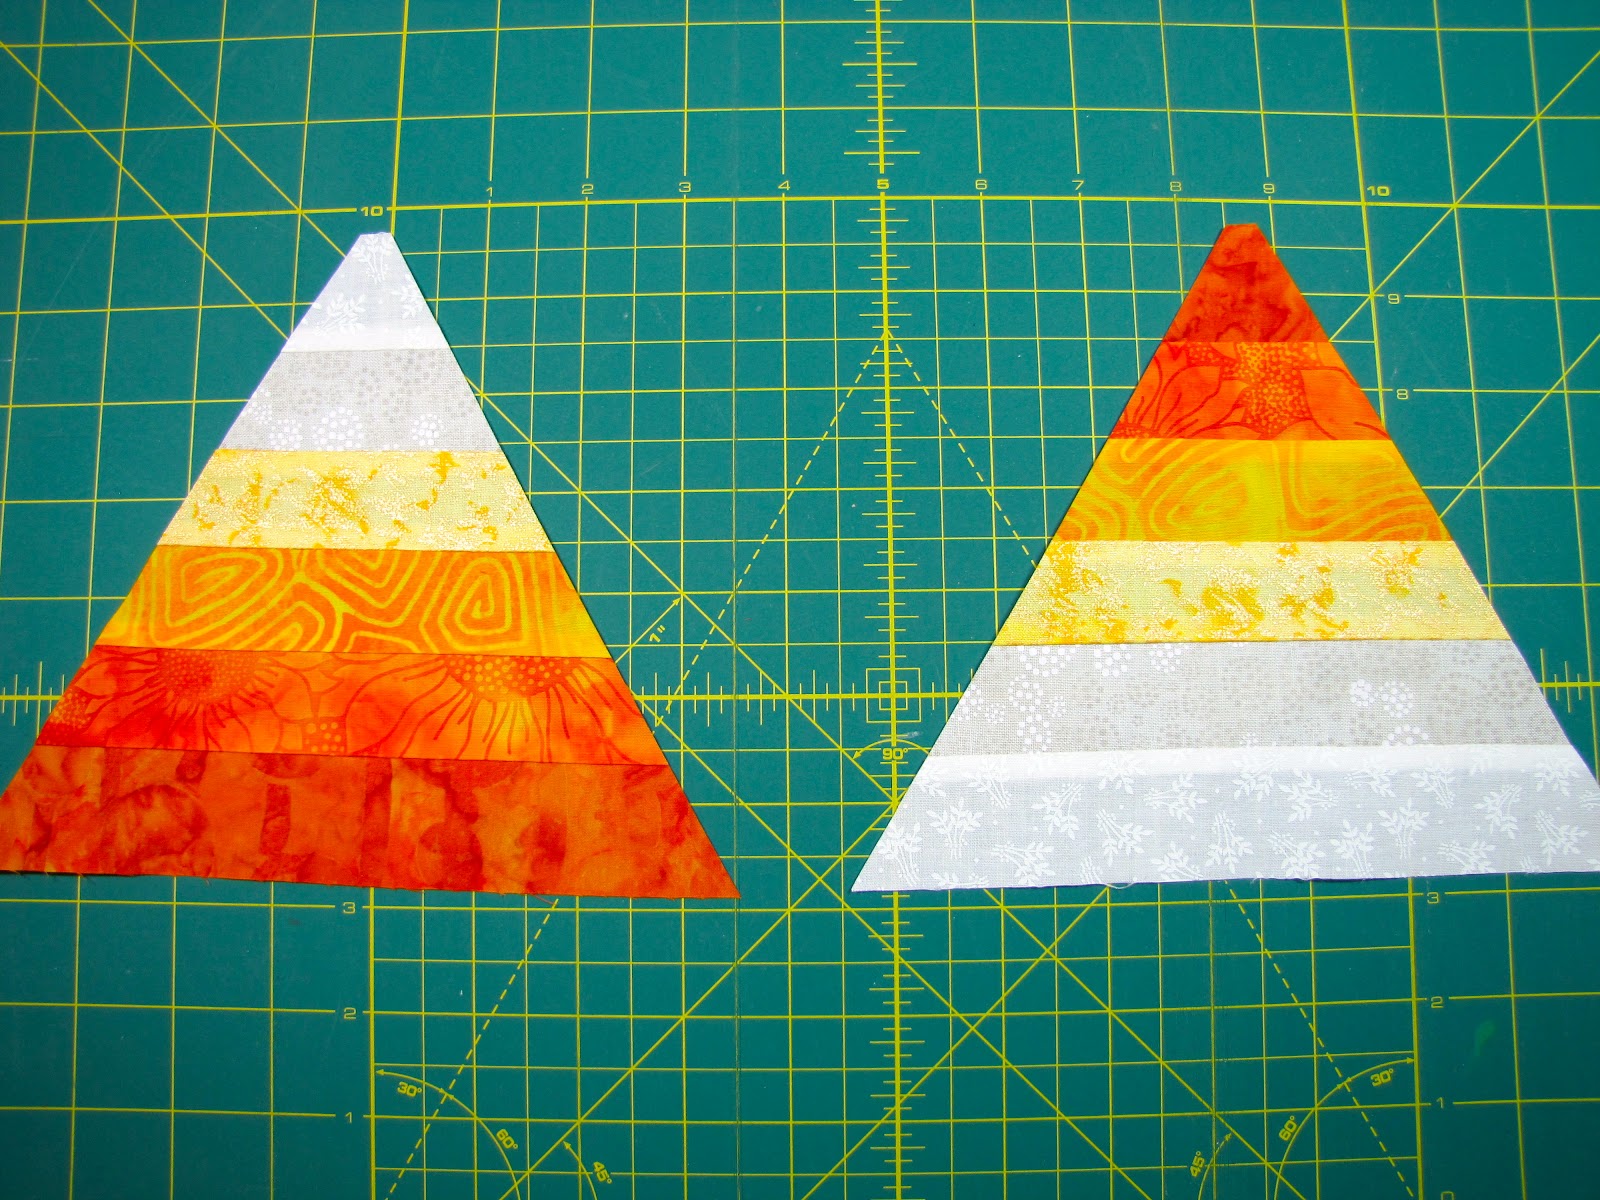
(6) ~ 1.5 X 12.5 inch strips.  I choose  two oranges, two yellows, and two creams.  They gently gradate from dark to lighter.


Then sew the top three together and the bottom three together.  Then sew the two sets together to form your candy corn strip set.


There are two ways to cut your candy corn.  If you have a 60 degree triangle ruler you can simply use this to cut your candy corn.


If not you can take a regular ruler and place the 60 degree line at the top edge of the cream.


and the edge of the ruler should intersect exactly with the corner of the bottom orange strip.
  

Now make your first cut on the left with your 60 degree ruler.


or with your regular ruler.


Then make your second cut on the right with your 60 degree ruler.


If you are using the regular ruler, reverse the ruler to the other side and then line up the 60 degree line with the cream strip.


and have the edge of the ruler intersecting the edge of the bottom orange strip.


Make your second cut.


Now you have your candy corn.  You can make one more from this strip set, but it will be a "reverse" candy corn.


Here is what you have.  Now for the background fabric.


You will need a fat quarter.


From the fat quarter:

Cut (2) ~ 3.5 X 13 5/8 inch strips
Cut (1) ~ 13 5/8 X 13 5/8 inch square


Lay your candy corn on the square and then..


Measure 2 7/8 inches in from each edge of the square, above shows the right side.


This shows the left side.


Now you will take your regular ruler and place the 60 degree line on the bottom edge of the gray square and 2 7/8 from the left edge.


Here is a closer look.


Or if you have the 60 triangle ruler you may use it by placing it exactly 2 7/8 inches in from both edges of the square, as shown above.


You will make your first cut with either ruler and it will go 6.5 inches up to the top of where the candy corn will be.


Here is a better photo.


Now make your second cut on the right.


Here it is with the regular ruler.


Once those cuts have been made you will measure 6.5 inches up from the bottom edge of the square and cut across the top edge of the ruler.


Do the same to the right side.


Here are the pieces that you will have.  You can discard the triangle.


Take the left side and lay it over the candy corn as such.  Leaving the corner of the left edge of the candy corn slightly exposed, about 1/4 inch.


Here is a close up.  Sew the background fabric to the candy corn and press towards the background.


Now take the right side and repeat.


Laying it on the candy corn with the bottom edge exposed about 1/4 inch.


Here is the close up.  Sew the right side of the background to the candy corn and press to background.


Here is what you have now.  This is where you will add the two 3.5 X 13 5/8 inch strips to the top and the bottom.  Sew them on...


Here is what you will have, press towards the background away from the candy corn.


Trim the edges down to 12.5 inches square.


Now you have a Candy Corn block, but don't stop there....


Layer it and quilt with a really pretty variegated thread.


Here is the backing fabric I used on mine.


Here is the quilting.  Now bind and then get creative!


I made two and then filled these jars with candy corns and pumpkins,  some candy corn hand sanitizer, and little pumpkin witch photo holders (found at Pier 1 imports) 


Wrap them up and then send them to your daughter and her roommate at college!  They loved them!!

Or you can make an entire candy corn quilt!! How fun would that be?  Or you can make little trick or treat bags from the blocks for the little ones in your life!  They would love it!! 

I hope you enjoyed the tutorial and I would love to see your blocks!  


Would you like to win these??? I am giving away 10 fat quarters of Gypsy Bandana fabric that I have leftover in the shop and would love for one of you to have them!!  

Here is what you need to do:

1) Leave a comment and tell me what you think about the candy corn block and what you plan to make with it. (one entry)
2)  Sign up for my e-newsletter, click here, then leave a comment letting me know you have signed up.(second entry)

That is it!! The giveaway will remain open for a week.  Good luck!!

**** Thank you to all who entered the giveaway and have enjoyed the tutorial! The giveaway is now closed and I will be announcing the winner soon. *****

Until Next Time...

Share/Bookmark
Related Posts Plugin for WordPress, Blogger...