Hello Everyone,
This is something that I have wanted to share with you for a long time. Since I am a Certified National Teacher for Judy Niemeyer, I thought I would share the basics of paper piecing with you. As I realize there are always several ways to do various techniques, this is the way that I paper piece and I hope that it is informative and helpful to you!
This tutorial will focus just on straight piecing of flying geese, no curved piecing.
It is based on Judy Niemeyer's pattern, Which Way is North, which can be found in my shop by
clicking here if you are interested. This is a great pattern for a beginner paper piecer.
First begin with your paper foundation unit. You will see that each sew line is labeled in numerical order for each step.
For this unit you will need to cut these fabrics from your templates. 8 background pieces and 3 geese units.
These are some of the basic tools that I use to paper piece.
1. Add a quarter ruler
2. Template plastic cut into a rectangle.
3. Microtex Sharp Needles 70/10
4. Purple Thang (acts as a stiletto)
5. Fabric glue stick
6. 50 weight thread for piecing
7. Rotary cutter with a NEW blade
Begin by turning your foundation paper over and placing some fabric glue on the back like so for your first piece of fabric.
Don't wait to long to place the fabric down as the glue will dry quickly. Place the fabric wrong side down. I use the glue so I don't have to pin.
Now turn the foundation over and you will see how much the first triangle will overlap. When the fabric is pre-cut with the template there is an allowance for a larger piece of fabric to assure coverage on the foundation.
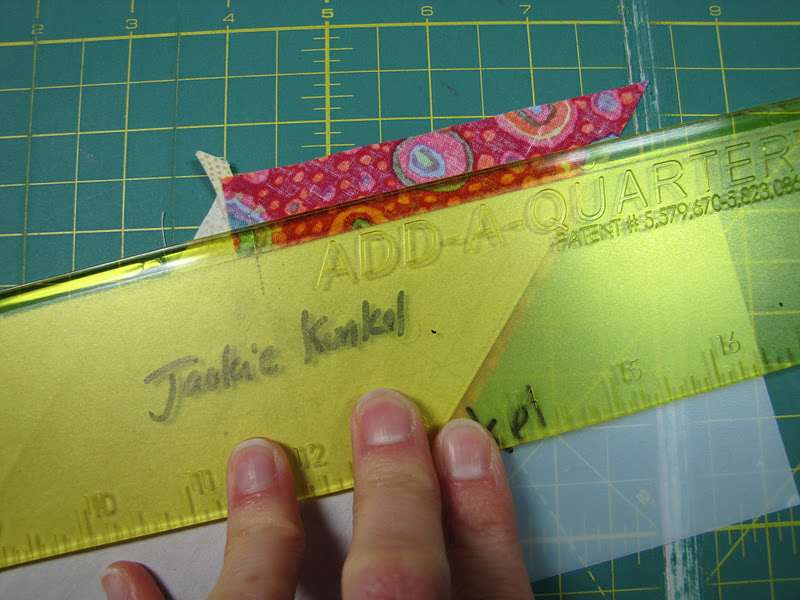
Take your template plastic and place on Line 1.
While holding the template plastic in place, fold back the foundation paper.
Place the lip of the add a quarter ruler on the edge of the paper and template plastic as pictured.
Trim the fabric with your rotary cutter down to 1/4 inch seam allowance.
Take one of your background pieces and line it up as shown, right side up.
With right sides together, place it with the first fabric piece, aligning the edges of the fabric with one another.
Make sure your sewing machine is set to a stitch length of 1.5 - 1.8. This allows for the paper to be perforated and peeled away easier and it is also more stable when you are pulling the paper away.
Sew on Line 1.
It will look like the above.
Turn it over and press towards the background.
Turn the foundation back over and place the template plastic on Line 2.
Fold back the foundation paper over the template plastic. Because you have sewn into the seam line the fabric will pull back too. That is okay, because...
While holding onto the paper and the template (firmly), just pull back the fabric from the paper.
Now place the add a quarter ruler on the paper and template.
Trim away the excess to leave the 1/4 inch seam allowance.
Take your second background piece, right side up and aligned as shown...
and place it right sides together with the geese fabric, aligning the edges of the fabric as shown.
Sew on line 2, you will begin this time sewing in the seam allowance.
It will now look like this.
Press the towards the background.
We will now add the next "goose". Place the template plastic on Line 3.
Fold back the paper and fabric.
While holding firmly, pull the fabric away from the paper.
Place the add a quarter ruler on the paper and template.
Trim away the excess fabric.
Take your next geese unit, right sides up...
and place it under the foundation unit aligning the edges of the fabric with right sides together.
Sew on line 3. Repeat the above process until you have all geese and background triangles sewn in place. Once this is done...
Turn your block over with fabric side down. Place your regular ruler...
on the SOLID line on the edge for trimming.
Trim away the excess.
Repeat this on the top...
and the remaining sides.
Once it is trimmed it will look like the above.
The only pieces left are the two strips for the sides.
These will be sewn onto either side of the block. This is the ONLY time we will be sewing on the dotted line.
Once they are on, it will look like the above.
Press towards the sides. Now we need to square up the block.
Trim off the upper and lower edges to be even with the paper pieced geese block.
Like so.
Now take your ruler and align it very carefully with the middle of the flying geese on the 3 -1/4 inch line, as shown above. This is the dead center of the block. Click on the photo to enlarge for detail.
Once it is aligned properly, trim away the sides.
You now have a perfect 6.5 inch block, with perfect points! The true beauty of paper piecing is accuracy.
Repeat to make 4 units... and then... keep on going... fly away! Once you are ready to join the units, make sure you remove the paper!
This is the pattern that I am using. If you would like to give paper piecing a try with this pattern you can find it in my shop by
clicking here. You will also find many other paper piecing patterns by Judy Niemeyer there.
I hope you have found this tutorial helpful and informative.
Until Next Time...


Paper Piecing, A Step By Step Tutorial